
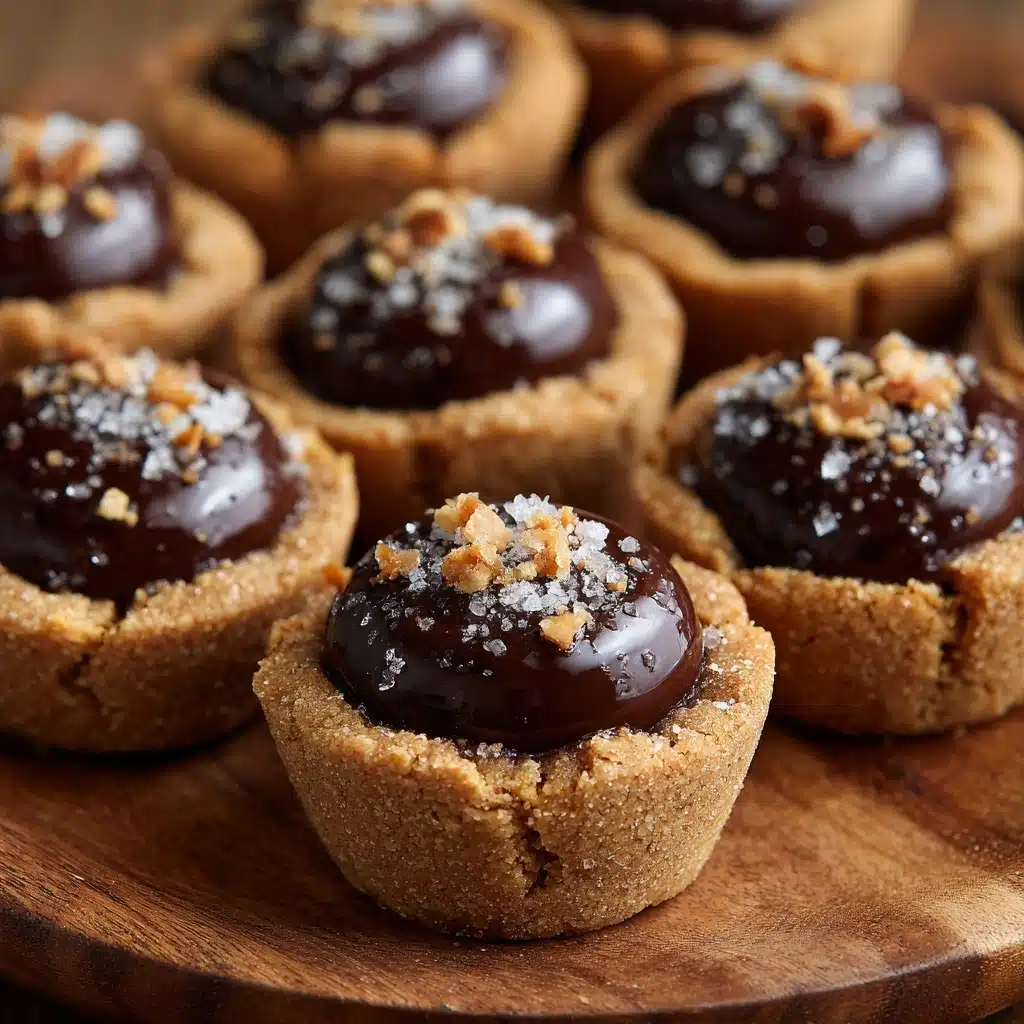
Imagine all the delicious layers of your favorite candy bar packed into a buttery, bite-sized treat — that’s the magic of Twix Cookie Cups. These little wonders are a show-stopping dessert, featuring a soft cookie base, gooey caramel center, and a glossy chocolate cap. They’re the perfect marriage of nostalgic flavors and playful baking, guaranteed to wow at any gathering or brighten up your weekday sweet tooth.

Ingredients You’ll Need
With just a handful of familiar ingredients, you’ll be amazed by how these simple elements blend together to form such a spectacular treat. Each component brings its own unique charm, from rich butter to luscious caramel and dreamy chocolate.
- Unsalted Butter (1 cup, softened): This creates that melt-in-your-mouth texture and an irresistibly rich cookie base.
- Granulated Sugar (½ cup): Adds sweetness and helps the cookie cups achieve a light golden color.
- Large Egg (1): Binds the dough and keeps each cup gorgeously soft and tender.
- Vanilla Extract (1 teaspoon): Brings a warm, aromatic note that rounds out all the flavors.
- All-Purpose Flour (2¼ cups): The foundation for structure, creating a cookie cup that holds in all that caramel goodness.
- Salt (½ teaspoon): Just enough to balance the sweetness and enhance the overall flavor.
- Caramel Sauce (½ cup, melted slightly): The star of the show — choose a good-quality soft caramel or make your own for extra wow factor.
- Milk or Dark Chocolate Chips (1 cup): For that signature glossy chocolate layer; choose your favorite variety for a personal twist.
- Coconut Oil or Butter (1 teaspoon): This makes the chocolate layer extra smooth and shiny.
How to Make Twix Cookie Cups
Step 1: Prepare and Preheat
Start by preheating your oven to 350°F (175°C) and lightly greasing a mini muffin tin. This is your blank canvas for a batch of perfect Twix Cookie Cups, so make sure each well is ready to release those cookie marvels with ease.
Step 2: Make the Cookie Dough
In a large mixing bowl, cream together the softened butter and sugar until the mixture becomes light, fluffy, and irresistible (don’t be afraid to sneak a taste). Next, beat in the egg and vanilla extract until everything’s beautifully combined, then gently stir in the flour and salt until a soft dough forms — you’re looking for a consistency that scoops and presses easily.
Step 3: Shape Into Cups
Take about a tablespoon of dough per cookie cup and scoop it into each section of your prepared mini muffin tin. Using your fingers, the back of a spoon, or a small tart press, gently push the dough up the sides and create a deep little well in the center. This is the space that will soon cradle that dreamy caramel layer!
Step 4: Baking the Cookie Cups
Bake for 10 to 12 minutes, keeping an eye out for those inviting golden edges while the centers stay a little soft. Fresh from the oven, you’ll need to act quickly—grab your tart press or a handy spoon and reinforce those cookie cups while they’re warm, so the wells are ready for the magic ahead. Let the cookie cups cool completely in the pan to keep their shape.
Step 5: Filling with Caramel
Once cool, it’s time to spoon about a teaspoon of that melty caramel sauce into each cookie cup. Don’t be afraid to go generous—after all, the gooey, buttery richness is what makes Twix Cookie Cups truly irresistible. A little patience here ensures you don’t break through the cookie base.
Step 6: Topping with Chocolate
In a microwave-safe bowl, melt the chocolate chips together with coconut oil in 30-second bursts, stirring each time until the chocolate is completely smooth. Whether you spoon or pipe, cover the caramel with a lovely layer of melted chocolate, giving each cup a decadent finish. Let the chocolate set at room temperature, or pop the tray in the fridge to speed things up. Voila—your Twix Cookie Cups are ready to shine!
How to Serve Twix Cookie Cups
Garnishes
A little garnish can turn these cookie cups into absolute showpieces! Try sprinkling a pinch of flaky sea salt over the chocolate for a sophisticated salted caramel effect, or add festive sprinkles for birthdays and holidays.
Side Dishes
Pair Twix Cookie Cups with a scoop of vanilla ice cream for an over-the-top dessert, or keep things simple with a steaming mug of coffee or chai tea on the side. Their sweetness also pairs well with fresh strawberries or a crisp fruit salad.
Creative Ways to Present
If you want to pull out all the stops, serve these cookie cups on a tiered dessert stand for special occasions or stack them in a glass jar tied with ribbon for a darling homemade gift. You could even plate them with drizzles of extra caramel and a dusting of cocoa powder for dinner party flair.
Make Ahead and Storage
Storing Leftovers
Twix Cookie Cups store wonderfully in an airtight container at room temperature for up to four days. Just layer a sheet of parchment between cookie cups to prevent the chocolate from smudging or sticking.
Freezing
For long-term storage, these cookie cups can be frozen, chocolate and all! Wait until the chocolate is fully set, then freeze in a single layer before transferring to a freezer bag. When you’re craving a treat, just thaw at room temperature for about an hour.
Reheating
While Twix Cookie Cups are delightful straight from the container, you can revive them with a quick 5-10 second zap in the microwave to bring back that gooey caramel center. Just don’t overdo it or the chocolate may melt more than you intended.
FAQs
Can I make Twix Cookie Cups without a mini muffin tin?
While a mini muffin tin gives you the signature cup shape, you can use regular muffin tins for larger cups. Just increase the baking time a bit and keep an eye on doneness. You could also shape “thumbprint” cookies on a tray as an alternative.
What kind of caramel sauce works best?
Either homemade or high-quality store-bought work well; just be sure it’s not super runny or overly thick. Soft, chewy caramel melts beautifully — if using a firmer caramel, warm it slightly to make spooning easier.
Can I use gluten-free flour for this recipe?
Yes, a one-to-one gluten-free baking flour blend can usually be swapped without trouble. Texture might change slightly, but you’ll still get a delightful bite-sized treat.
How do I stop the chocolate from cracking?
Mixing in a bit of coconut oil or butter (as the recipe suggests) helps the chocolate to set smoothly and makes it less likely to crack when you bite in. Be sure to let the Twix Cookie Cups come to room temperature before serving if they’ve been chilled.
Can I double or halve the recipe?
Absolutely! This recipe scales beautifully, so feel free to double for a party tray or halve it for a small-batch treat. Just adjust your baking times if your cups are bigger or smaller than the original.
Final Thoughts
There’s something undeniably charming about homemade Twix Cookie Cups — they’re nostalgic, playful, and endlessly rewarding to share (if you can bring yourself to part with a few!). I can’t wait for you to try this recipe and enjoy every delicious layer. Happy baking, and savor every bite!
Print
Twix Cookie Cups Recipe
- Total Time: 32 minutes (plus cooling time)
- Yield: 24 cookie cups 1x
- Diet: Vegetarian
Description
Indulge in these delightful Twix Cookie Cups that combine buttery cookie cups filled with gooey caramel and topped with a rich chocolate layer. These bite-sized treats are a perfect miniature version of the classic Twix bar, sure to satisfy any sweet tooth.
Ingredients
Cookie Cups:
- 1 cup unsalted butter (softened)
- ½ cup granulated sugar
- 1 large egg
- 1 teaspoon vanilla extract
- 2¼ cups all-purpose flour
- ½ teaspoon salt
Caramel Filling:
- ½ cup caramel sauce (soft or chewy variety, melted slightly)
Chocolate Layer:
- 1 cup milk or dark chocolate chips
- 1 teaspoon coconut oil or butter (for smoother chocolate layer)
Instructions
- Preheat the oven: Preheat the oven to 350°F (175°C) and lightly grease a mini muffin tin.
- Mix butter and sugar: Cream softened butter and sugar in a large bowl until light and fluffy.
- Add egg and vanilla: Mix in the egg and vanilla extract until combined.
- Combine dry ingredients: Stir in the flour and salt until a soft dough forms.
- Shape cookie cups: Scoop about 1 tablespoon of dough into each mini muffin cup, press gently to form a cup shape with a slight indent in the center.
- Bake: Bake for 10–12 minutes until golden around the edges and slightly set in the center.
- Add caramel: Spoon about 1 teaspoon of caramel into each cookie cup.
- Prepare chocolate layer: Melt chocolate chips with coconut oil in the microwave, then spoon or pipe over the caramel.
- Set chocolate: Let the chocolate layer set at room temperature or chill briefly until firm.
Notes
- You can use store-bought or homemade caramel.
- Add a pinch of sea salt on top of the chocolate for a salted caramel version.
- Prep Time: 20 minutes
- Cook Time: 12 minutes
- Category: Dessert
- Method: Baking
- Cuisine: American
Nutrition
- Serving Size: 1 cookie cup
- Calories: 180
- Sugar: 12g
- Sodium: 60mg
- Fat: 10g
- Saturated Fat: 6g
- Unsaturated Fat: 3g
- Trans Fat: 0g
- Carbohydrates: 20g
- Fiber: 1g
- Protein: 2g
- Cholesterol: 20mg
