
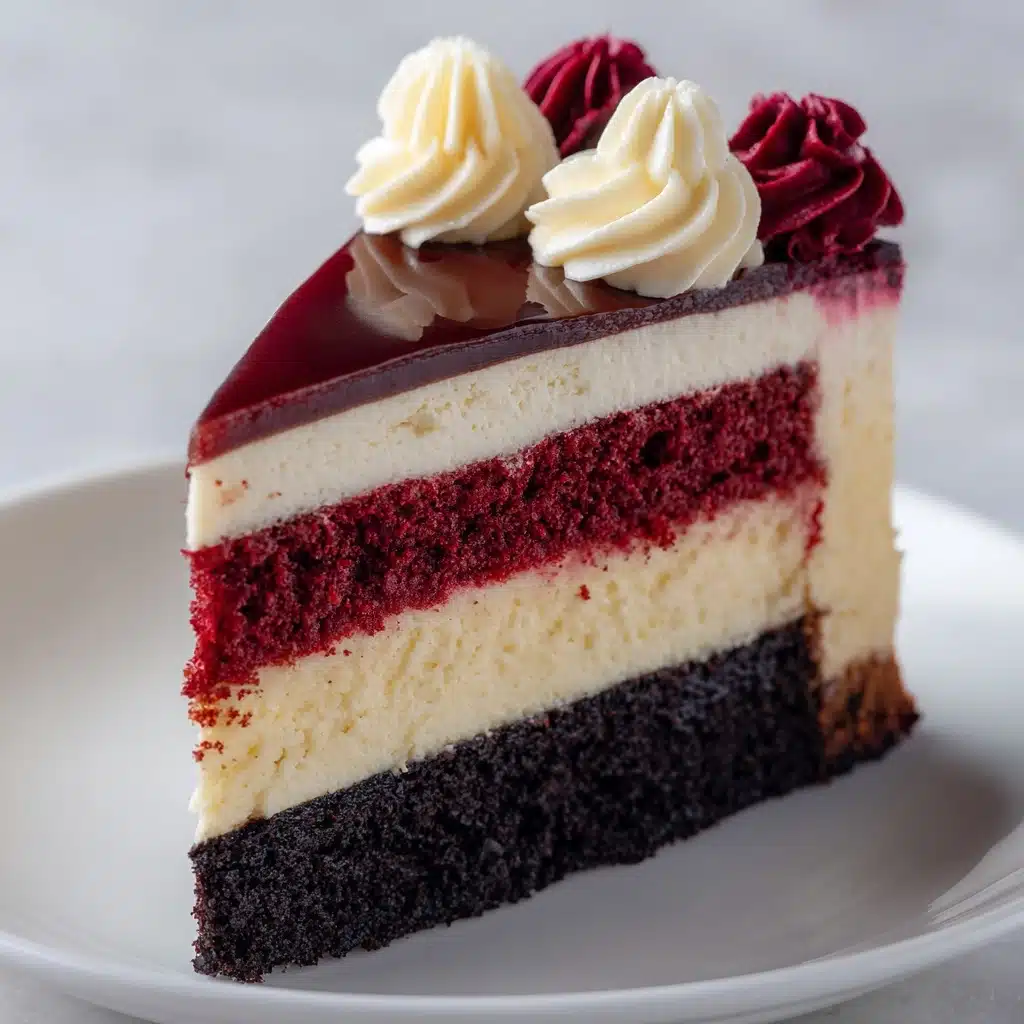
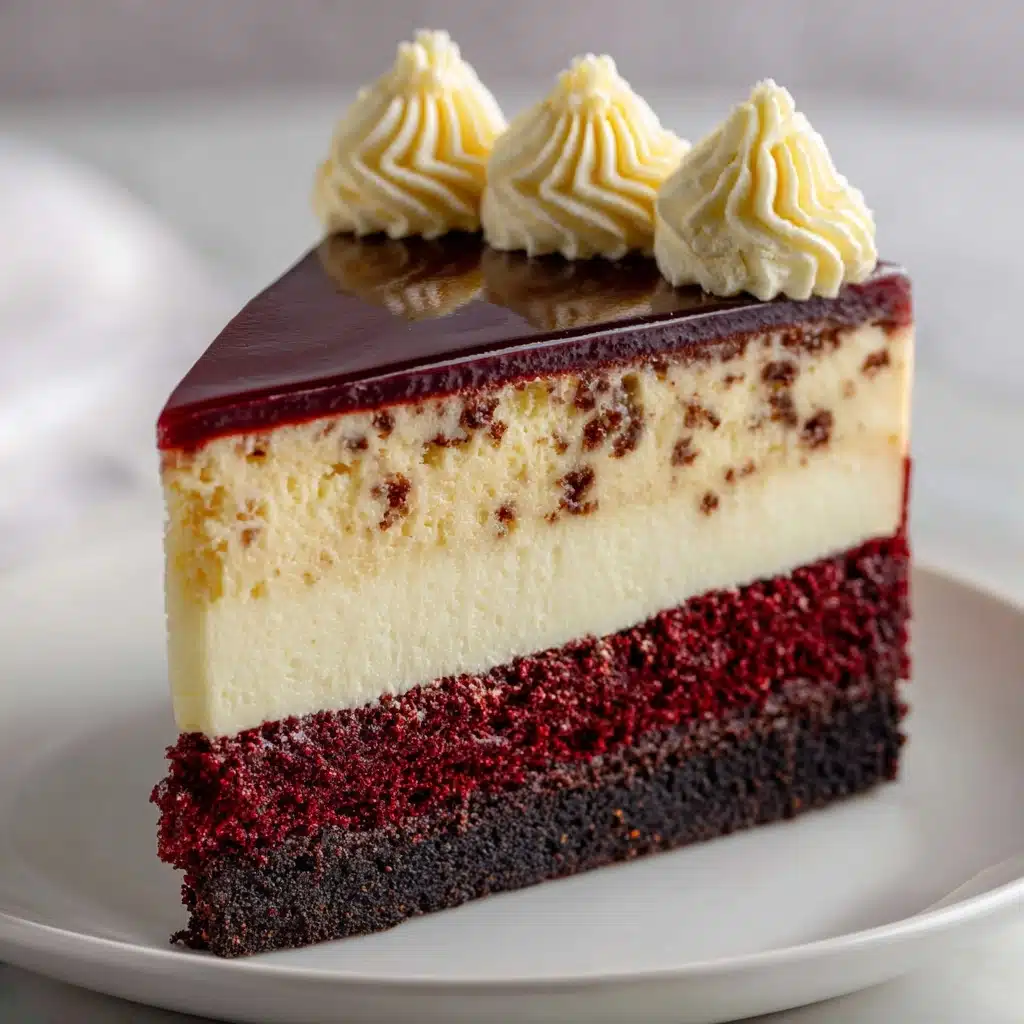
If you’re ready to wow your taste buds and impress every guest at your table, this Homemade Red Velvet Cheesecake will become your new showstopper. With its striking maroon hues, creamy texture, and chocolatey undertones, it’s a stunning marriage of two classic desserts: lush red velvet cake and rich, dreamy cheesecake. Whether you’re baking for a celebration or simply to treat yourself, this recipe blends indulgence and nostalgia into every slice. One bite and you’ll know why it always vanishes fast at my gatherings!
Ingredients You’ll Need
Sometimes greatness comes from combinations that are as simple as they are unforgettable. Each ingredient in this Homemade Red Velvet Cheesecake has a starring role: the crunchy chocolate crust, the velvety filling, and the airy whipped cream on top all merge for pure dessert bliss. Gathering these pantry staples is your first step to cheesecake happiness.
- Chocolate cookie crumbs: Bring rich, cocoa flavor and an irresistible crunch to the base.
- Granulated sugar: Sweetens both the crust and cheesecake, balancing the tangy cream cheese.
- Unsalted butter, melted: Holds the crust together and gives it a luxurious mouthfeel.
- Cream cheese, softened: The soul of the cheesecake, delivering that signature silkiness.
- Unsweetened cocoa powder: Adds subtle chocolate flavor and deepens the gorgeous red color.
- Sour cream: Lends tanginess and moisture to the filling for a softer texture.
- Large eggs: Provide structure and ensure the cheesecake sets just right.
- Vanilla extract: Boosts the flavors and adds an irresistible aroma.
- Red food coloring: Creates the stunning red velvet shade that sets this dessert apart.
- Buttermilk: Adds a slight tang and keeps the filling extra tender.
- Heavy whipping cream: Whips up into a cloud-like topping.
- Powdered sugar: Sweetens the whipped cream without any grittiness.
- Red velvet cake crumbs or chocolate shavings: The perfect finishing touch for beauty and crunch (totally optional but totally recommended!).
How to Make Homemade Red Velvet Cheesecake
Step 1: Prepare the Pan and Crust
Start by preheating your oven to 325°F (163°C). Grease a 9-inch springform pan, then tightly wrap the outside with a double layer of foil. This little trick prevents any water from sneaking in during the water bath. In a medium bowl, mix the chocolate cookie crumbs, granulated sugar, and melted butter. Press this mixture firmly into the bottom of your prepared pan—it’s okay to use your fingers or the bottom of a glass here for an even layer. Bake the crust for 10 minutes, then set it aside to cool while you work on the filling.
Step 2: Whip Up the Creamy Cheesecake Filling
Grab a large bowl and beat together the softened cream cheese and sugar until the mixture is dreamy and smooth with no lumps in sight. Next, add the cocoa powder and stir it in until just combined, bringing that whisper of chocolate to the party. Add the sour cream, then beat in the eggs, one at a time, for maximum creaminess. Stir in the vanilla extract and that dramatic spoonful of red food coloring. Lastly, pour in the buttermilk and beat on low speed until everything is perfectly incorporated, scraping down the bowl as you go to make sure no pockets are left behind.
Step 3: Bake to Velvety Perfection
Pour your deep red batter over the cooled crust, smoothing the top with a spatula if needed. Set the pan inside a large roasting pan, then carefully fill the roasting pan with hot water so it comes halfway up the sides of the springform pan (no splashing!). This water bath keeps your cheesecake tender and prevents cracked tops. Bake for 55–65 minutes, until the center is just set but still gently jiggly—think of it like a dance move, not a wobbly mess.
Step 4: Cool It Down Slowly
Turn off the oven and crack the door open just a bit, letting the cheesecake cool in the gentlest way for an hour right in the oven. This slow cooldown is a secret weapon against cracks. Then, remove your cheesecake from the water bath and let it chill out in the fridge for at least 4 hours or, for the best texture, overnight. This time lets those flavors meld and the texture set to sliceable perfection.
Step 5: Whip Up the Dreamy Topping and Serve
Just before serving, make the whipped cream topping by beating the heavy cream, powdered sugar, and vanilla extract to stiff peaks—you’ll know it’s ready when those peaks hold their shape like little mountains. Spread or artfully pipe this dreamy fluff over your chilled cheesecake, then add a final flourish with red velvet cake crumbs or chocolate shavings. Grab a sharp knife, slice generously, and prepare for the oohs and ahhs!
How to Serve Homemade Red Velvet Cheesecake
Garnishes
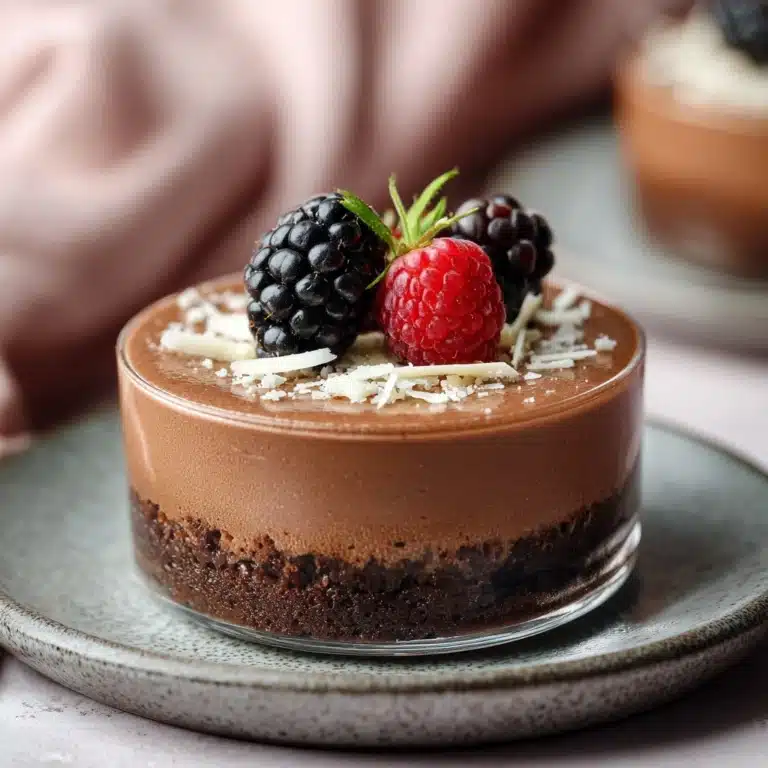
The finishing touches make a world of difference, and garnishing your Homemade Red Velvet Cheesecake is pure fun! Swirl or pipe clouds of homemade whipped cream on top, then sprinkle with more vibrant red velvet crumbs or a generous shower of chocolate shavings. Sometimes, a handful of fresh raspberries or a curl of white chocolate adds even more elegance and color contrast—let your creativity run wild.
Side Dishes
This cheesecake shines all by itself, but if you want to create a dreamy dessert spread, consider serving each slice with a scoop of vanilla bean ice cream, a dollop of tangy raspberry sauce, or tart fresh berries. Hot coffee, rich hot chocolate, or a celebratory glass of bubbly pairs beautifully with every creamy bite, making any occasion feel extra special.
Creative Ways to Present
Serving Homemade Red Velvet Cheesecake at a gathering? Try slicing it into mini bars or cubes for a dessert platter, layering individual jars with cheesecake filling and crumbs for a portable treat, or topping with edible gold leaf and a drizzle of chocolate sauce for a touch of glamour. No matter how you slice (or stack) it, the irresistible color and flavor always stand out.
Make Ahead and Storage
Storing Leftovers
If you’re lucky enough to have leftover cheesecake, store it tightly covered in the refrigerator for up to five days. For best results, keep garnishes and whipped cream separate until ready to serve—this prevents the topping from getting soggy. Each chill makes the flavors mingle even more deliciously.
Freezing
Homemade Red Velvet Cheesecake also freezes beautifully! To freeze, wrap individual slices or the whole cheesecake (minus whipped topping) in plastic wrap, followed by a layer of foil. Freeze for up to two months. Thaw overnight in the refrigerator before adding fresh whipped cream and garnishes.
Reheating
While cheesecake is best enjoyed cold or at room temperature, if you like it warmer you can let a slice sit out for a bit before serving. Avoid reheating in the microwave, which can mess with the texture—slow thawing in the fridge is the way to go for perfect results every time.
FAQs
Can I make Homemade Red Velvet Cheesecake ahead of time?
Absolutely! This dessert is perfect for preparing in advance—just bake, cool, and chill overnight. Add the whipped topping and garnishes just before serving for the freshest presentation.
What’s the best way to prevent cracks in my cheesecake?
Baking in a water bath and letting the cheesecake cool slowly in the oven are key tricks. Also, ensure your ingredients are at room temperature to create a smooth, lump-free batter that bakes evenly.
Do I have to use red food coloring?
The food coloring gives that iconic red velvet color, but you can certainly skip it if you prefer. The flavor will be just as delicious—your cheesecake just won’t have the dramatic red hue.
Can I use a different pan size?
This recipe is designed for a 9-inch springform pan for thick, luxurious slices. If you use a different size or even a square pan, adjust the bake time and expect a thinner or thicker cheesecake as a result.
Are there any shortcuts for the crust or garnish?
Yes! Feel free to use ready-made chocolate cookie crumbs for the crust and store-bought red velvet cake crumbs or chocolate shavings for garnish to save time, especially if you’re baking for a crowd or a busy holiday.
Final Thoughts
If you want to treat yourself (and everyone lucky enough to score a slice), this Homemade Red Velvet Cheesecake is always the answer. It’s got vibrant color, classic flavor, and tons of wow factor. I hope you’ll try this recipe soon and make it the centerpiece of your own sweet celebrations—enjoy every decadent bite!
Print
Homemade Red Velvet Cheesecake Recipe
- Total Time: 5 hours 30 minutes (includes chilling)
- Yield: 12 servings 1x
- Diet: Vegetarian
Description
Indulge in the rich, decadent flavors of this Homemade Red Velvet Cheesecake. A velvety smooth cream cheese filling on a chocolate cookie crust, topped with whipped cream and a sprinkle of red velvet crumbs.
Ingredients
For the crust:
- 1 1/2 cups chocolate cookie crumbs
- 1/4 cup granulated sugar
- 5 tablespoons unsalted butter, melted
For the cheesecake filling:
- 3 (8 oz) packages cream cheese, softened
- 1 cup granulated sugar
- 3 tablespoons unsweetened cocoa powder
- 1 cup sour cream
- 3 large eggs
- 2 teaspoons vanilla extract
- 1 tablespoon red food coloring
- 1/2 cup buttermilk
For the topping:
- 1 cup heavy whipping cream
- 2 tablespoons powdered sugar
- 1/2 teaspoon vanilla extract
- red velvet cake crumbs or chocolate shavings (optional garnish)
Instructions
- Preheat oven to 325°F (163°C). Grease a 9-inch springform pan and wrap the outside with a double layer of foil to prevent leaks. In a medium bowl, combine the chocolate cookie crumbs, sugar, and melted butter. Press the mixture firmly into the bottom of the prepared pan. Bake the crust for 10 minutes, then remove and let cool.
- In a large bowl, beat the cream cheese and granulated sugar until smooth and creamy. Add cocoa powder and mix until combined. Add the sour cream, eggs (one at a time), vanilla extract, and food coloring. Mix until smooth. Slowly add the buttermilk and beat on low speed until fully incorporated, scraping down the sides as needed.
- Pour the batter over the crust. Place the pan in a large roasting pan and fill the roasting pan with hot water halfway up the sides of the springform. Bake for 55–65 minutes, or until the center is just set but still slightly jiggly. Turn off the oven, crack the door, and let the cheesecake cool for 1 hour. Then remove from the water bath and chill for at least 4 hours or overnight.
- For the topping, whip the heavy cream, powdered sugar, and vanilla extract to stiff peaks. Spread or pipe over the chilled cheesecake. Garnish with red velvet crumbs or chocolate shavings if desired. Slice and serve.
Notes
- For a shortcut, use store-bought red velvet cake crumbs for the garnish.
- Be sure all ingredients are at room temperature to ensure a smooth filling.
- Prep Time: 30 minutes
- Cook Time: 1 hour
- Category: Dessert
- Method: Baking
- Cuisine: American
Nutrition
- Serving Size: 1 slice
- Calories: 510
- Sugar: 32g
- Sodium: 320mg
- Fat: 35g
- Saturated Fat: 20g
- Unsaturated Fat: 12g
- Trans Fat: 0g
- Carbohydrates: 41g
- Fiber: 1g
- Protein: 7g
- Cholesterol: 135mg

