
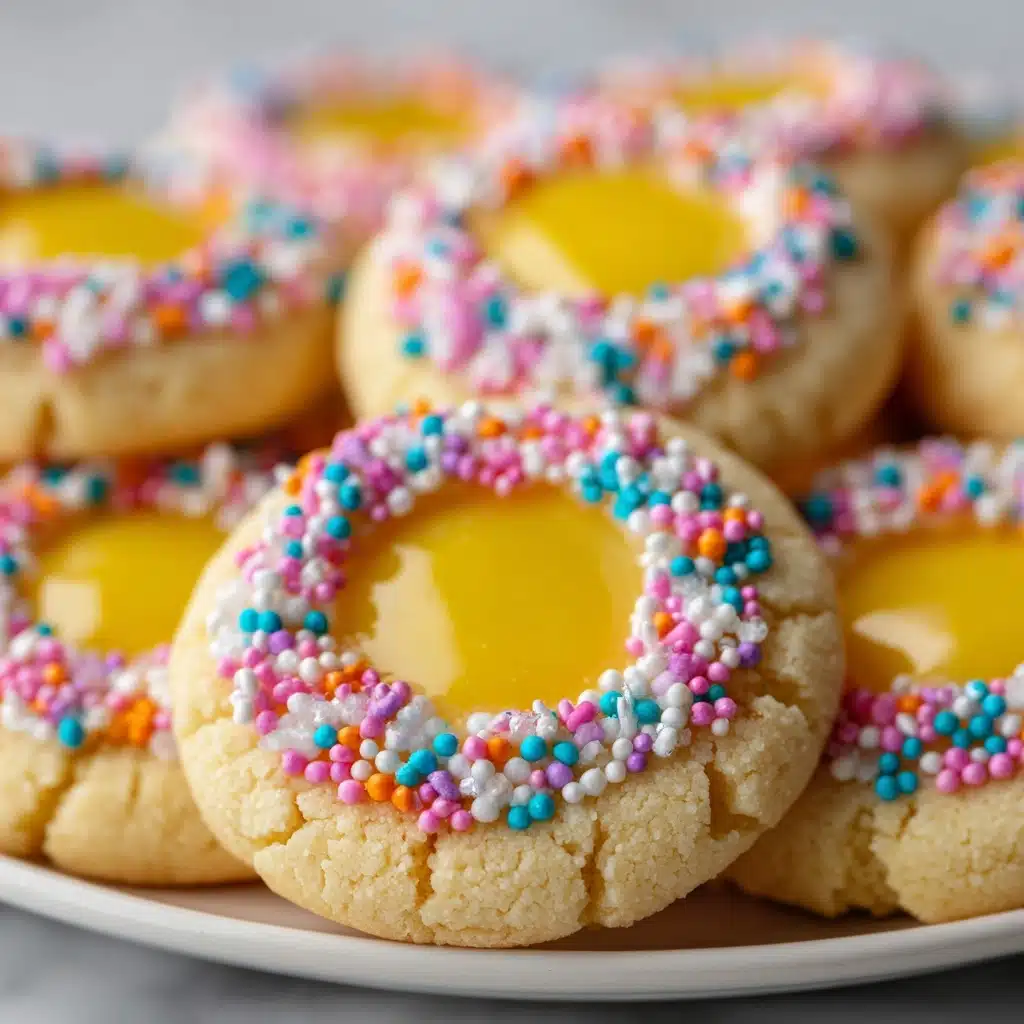
If there’s one treat destined to steal the show on your holiday dessert table, it’s this playful, crowd-pleasing Easter Thumbprint Cookies Recipe. Imagine tender, buttery cookies nestled with jewel-toned jam centers, their edges dusted in cheery pastel sprinkles — impossible to resist! These cookies strike the perfect balance between melt-in-your-mouth richness and delicate sweetness, making them ideal for Easter celebrations or any spring gathering. Let’s dive into this colorful tradition, and bake a batch that’s as fun to make as it is to eat!
Ingredients You’ll Need
When it comes to the Easter Thumbprint Cookies Recipe, a handful of everyday ingredients magically combine to create pure cookie bliss. Each addition has a delicious purpose: from the creamy butter forming the cookie’s backbone to the vibrant jams offering bursts of fruity flavor. Here’s what you’ll need and why each item matters:
- Unsalted Butter (1 cup, softened): The base of every great thumbprint cookie, bringing luscious flavor and irresistible tenderness.
- Granulated Sugar (1/2 cup): Adds just enough sweetness, helping the cookies achieve their perfect golden hue.
- Egg Yolk (1 large): Gives richness and that lovely chewy texture in each bite.
- Vanilla Extract (1 teaspoon): Infuses warmth and depth, balancing out the buttery dough.
- All-Purpose Flour (2 1/4 cups): Provides structure, ensuring the cookies hold their adorable shape after baking.
- Salt (1/4 teaspoon): Enhances all the flavors, making every ingredient sing.
- Pastel-Colored Sprinkles or Sanding Sugar (1/2 cup, optional): A playful, festive touch for that beautiful Easter flair.
- Fruit Jam or Preserves (1/2 cup, such as raspberry, apricot, or lemon curd): The star in the center — offering both color and tangy-sweet flavor.
- Icing or White Chocolate Drizzle (optional): Takes presentation up a notch, making the cookies truly special for the occasion.
How to Make Easter Thumbprint Cookies Recipe
Step 1: Prepare Your Oven and Baking Sheet
Start by preheating your oven to 350°F, then line a baking sheet with parchment paper. This simple step guarantees your cookies will bake evenly and lift right off, with no sticky mess left behind.
Step 2: Cream the Butter and Sugar
In a large mixing bowl, use an electric mixer to cream together the softened butter and granulated sugar until the mixture is pale, fluffy, and almost cloud-like. This gives your cookies their signature tender texture, so take your time here!
Step 3: Add Egg Yolk and Vanilla
Beat in the egg yolk and vanilla extract until fully incorporated. You’ll notice the dough getting silkier, which will help the cookies hold together and have a wonderful, rich aroma as they bake.
Step 4: Mix in the Dry Ingredients
Gradually add in the flour and salt, mixing just until a soft, cohesive dough forms. Don’t overwork it! A gentle hand keeps the cookies extra tender.
Step 5: Shape and Coat the Dough Balls
Scoop out small portions of dough (about 1 inch in diameter) and roll them into balls. If you want to embrace the Easter color palette, roll each ball in pastel sprinkles or sanding sugar before placing them onto your prepared baking sheet, about 2 inches apart.
Step 6: Make the Thumbprints
Using your thumb (or the back of a small spoon), gently press a well into the center of each ball. This signature move not only gives these cookies their classic look, but also makes the perfect pocket for luscious jam.
Step 7: Fill and Bake
Spoon about 1/2 teaspoon of jam or your favorite preserve into each indentation. Then bake for 12–14 minutes, just until the cookie edges turn lightly golden. The recipe comes to life in the oven, filling your kitchen with the scents of spring!
Step 8: Cool and Decorate
Allow the cookies to cool on the baking sheet for 5 minutes, then transfer to a wire rack. Once completely cool, drizzle with icing or melted white chocolate for a final festive flourish — this extra step is simple, but it wows every time.
How to Serve Easter Thumbprint Cookies Recipe

Garnishes
For a dazzling finishing touch, consider a light dusting of confectioners’ sugar, a zigzag of white chocolate, or even a scattering of more pastel sprinkles on top. These simple accents make your Easter Thumbprint Cookies Recipe truly irresistible and photo-worthy!
Side Dishes
Pair a plate of these treats with lightly sweetened fresh berries, a bowl of creamy vanilla yogurt, or a refreshing fruit salad. A cup of tea or a frothy cappuccino makes the perfect companion for a cookie break with loved ones.
Creative Ways to Present
You can arrange your Easter Thumbprint Cookies on a tiered cake stand, tuck them into colorful paper liners, or box them up in clear gift bags tied with pastel ribbons. They’re also fantastic nestled into Easter baskets or displayed along with chocolate eggs for a playful, spring-inspired dessert table.
Make Ahead and Storage
Storing Leftovers
Your freshly baked Easter Thumbprint Cookies Recipe will stay tasty for up to four days when kept in an airtight container at room temperature. Be sure to let any icing or chocolate drizzle dry completely before stacking to keep them looking neat and fresh.
Freezing
If you want to prepare these cookies ahead, you can freeze them after baking! Lay them in a single layer on a baking sheet to freeze solid, then transfer to a freezer-safe container with parchment between layers. They’ll keep well for up to two months, making it easy to enjoy a bite of springtime whenever the mood strikes.
Reheating
To refresh cookies from the freezer, simply let them thaw at room temperature for about 30 minutes. If you prefer them lightly warm, a few seconds in the microwave makes them soft and fragrant again — just be careful not to overdo it, as the jam can get very hot!
FAQs
Can I use different kinds of jam?
Absolutely! The Easter Thumbprint Cookies Recipe shines with a variety of jams and preserves. Try raspberry, apricot, lemon curd, or even a tangy marmalade for a vibrant assortment — mixing up colors gives you that true spring vibe.
Do I have to use sprinkles?
Nope! While pastel sprinkles add a playful, festive look, the cookies are just as delicious without them. If you love things on the simpler side, skip the sprinkles — or try rolling some in shredded coconut for a fun twist.
What’s the best way to keep the jam from spilling over?
Be careful not to overfill the wells — about 1/2 teaspoon per cookie is the sweet spot. Also, pressing a deep enough indentation helps hold the jam snugly during baking.
Can kids help make the Easter Thumbprint Cookies Recipe?
Definitely! Kids love rolling the dough, making thumbprints, and sprinkling on the decorations. Supervision is needed with the hot oven, but most steps are fun and totally family-friendly.
Do I need to chill the dough before baking?
For this particular recipe, chilling isn’t required since the dough is already thick and easy to handle. However, if your kitchen’s extra warm or you want to prep ahead, a 15-minute chill in the fridge can help the cookies keep their shape neatly.
Final Thoughts
This Easter Thumbprint Cookies Recipe is more than just a delicious dessert — it’s a joyful baking project you’ll want to revisit every spring. Each bite brings a little celebration to your table, and sharing them might just become a new favorite tradition. Give them a try this Easter and see how quickly they disappear!
Print
Easter Thumbprint Cookies Recipe
- Total Time: 34 minutes
- Yield: 24 cookies 1x
- Diet: Vegetarian
Description
These Easter Thumbprint Cookies are a delightful treat for the holiday season. Soft, buttery cookies filled with fruity jam and topped with colorful sprinkles, these cookies are perfect for Easter gatherings or a festive springtime snack.
Ingredients
Cookies:
- 1 cup unsalted butter (softened)
- 1/2 cup granulated sugar
- 1 large egg yolk
- 1 teaspoon vanilla extract
- 2 1/4 cups all-purpose flour
- 1/4 teaspoon salt
- 1/2 cup pastel-colored sprinkles or sanding sugar (optional)
Filling:
- 1/2 cup fruit jam or preserves (such as raspberry, apricot, or lemon curd)
Decoration (Optional):
- icing or white chocolate drizzle
Instructions
- Preheat oven: Preheat oven to 350°F and line a baking sheet with parchment paper.
- Cream butter and sugar: In a large mixing bowl, cream together the butter and sugar until light and fluffy. Beat in the egg yolk and vanilla extract until smooth.
- Add dry ingredients: Gradually add flour and salt, mixing until a soft dough forms.
- Shape and fill cookies: Scoop dough into 1-inch balls. Roll in sprinkles if desired. Make an indentation in each ball and fill with jam.
- Bake: Bake for 12–14 minutes until lightly golden.
- Cool and decorate: Cool on the baking sheet before transferring to a wire rack. Drizzle with icing or white chocolate if desired.
Notes
- Experiment with different jam flavors for a variety of colors and flavors.
- Store cookies in an airtight container at room temperature for up to 4 days.
- Prep Time: 20 minutes
- Cook Time: 14 minutes
- Category: Dessert
- Method: Baking
- Cuisine: American
Nutrition
- Serving Size: 1 cookie
- Calories: 130
- Sugar: 7g
- Sodium: 45mg
- Fat: 7g
- Saturated Fat: 4g
- Unsaturated Fat: 2g
- Trans Fat: 0g
- Carbohydrates: 15g
- Fiber: 0g
- Protein: 1g
- Cholesterol: 20mg

