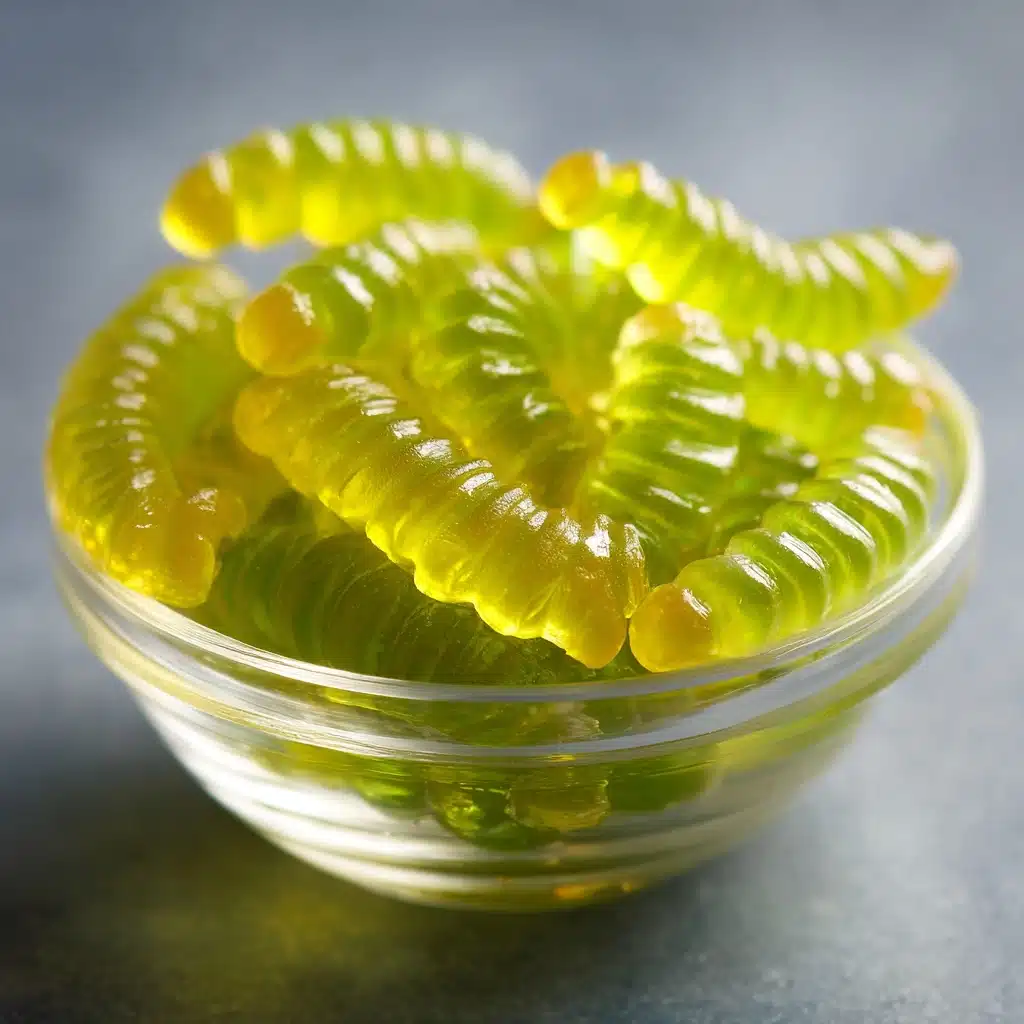
If you’re looking for the bite-sized snack that takes your love for pickles to a whole new, delightfully weird place, you simply have to try Dill Pickle Gummy Worms. These savory-sour gummies are bursting with real dill pickle flavor and a satisfyingly chewy texture that’s sure to raise eyebrows—in the best way. Whether you’re hosting a quirky party, want a conversation-starting treat for friends, or just need a new way to satisfy that briny craving, this recipe is clever, quick, and totally irresistible.
Ingredients You’ll Need
-
Ingredients:
- ¾ cup dill pickle juice (strained)
- ¼ cup water
- 2 tablespoons granulated sugar
- 3 tablespoons unflavored gelatin (about 3 packets)
- 1 teaspoon dill pickle seasoning or dried dill (optional)
- green food coloring (optional)
How to Make Dill Pickle Gummy Worms
Step 1: Combine Your Liquids
Start by whisking together the dill pickle juice, water, and sugar in a small saucepan. The water smooths out the strong pickle tang just enough, while the sugar tempers the tartness and hints at the candy these worms pretend to be. Make sure your pickle juice is strained and free of little seeds or solids for the best gummy texture.
Step 2: Bloom the Gelatin
Sprinkle the unflavored gelatin evenly over your liquid mixture. Pause here for a good five minutes—let the gelatin swell up and absorb those savory juices. This blooming step is crucial for gummies that are springy, not grainy.
Step 3: Dissolve the Gelatin
Set your saucepan over low heat. Stir slowly and constantly, keeping the heat gentle so your mixture never comes to a boil. In about 3 to 4 minutes, you’ll notice the gelatin fully dissolving and your liquid looking clear. This is your cue to move on—overheating can damage the gelatin and lead to less satisfying worms.
Step 4: Flavor and Color Your Worms
Whisk in the dill pickle seasoning or dried dill if you want an extra botanical punch. A single drop of green food coloring will send your Dill Pickle Gummy Worms straight into novelty snack territory—completely optional, but the color really pops!
Step 5: Pour and Chill
Carefully pour your liquid into gummy worm molds or any silicone candy molds you love. This process can be a little fiddly, but a small pitcher or even a turkey baster helps keep things neat. Gently transfer the tray to your refrigerator and let your creations chill for at least an hour, or until the worms are nice and firm.
Step 6: Unmold and Store
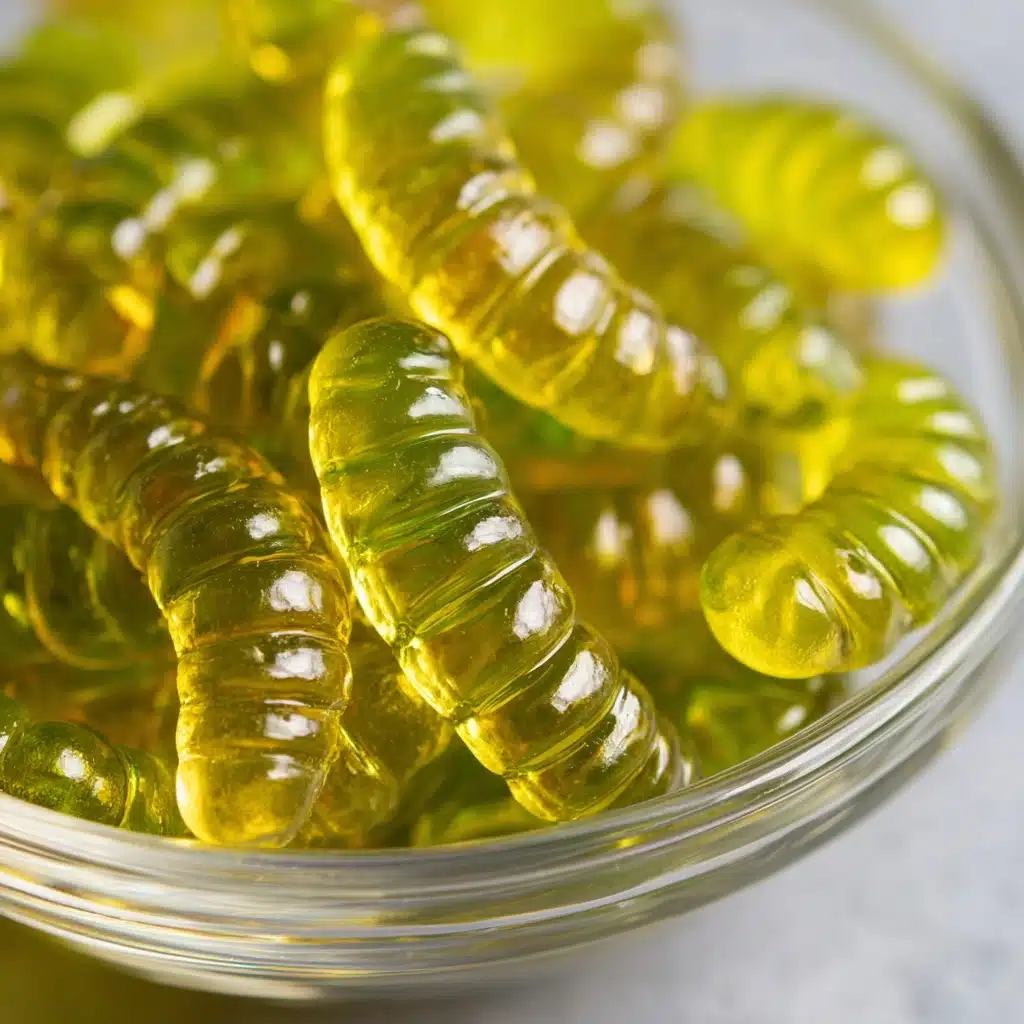
Once your Dill Pickle Gummy Worms have set, pop them out of their molds. Place them in an airtight container and stash them in the fridge. These snappy treats keep their best texture for about a week—if they last that long!
How to Serve Dill Pickle Gummy Worms

Garnishes
For a playful finishing touch, try dusting the gummies lightly with more dried dill or a sprinkle of citric acid for extra pucker power. A couple of fresh dill sprigs arranged on the serving platter hint at the bright, herby notes inside each worm.
Side Dishes
Pair these oddball candies with a cheese plate or cured meats to highlight their savory edge. Their briny bite also makes a fun palate cleanser on a snack board loaded with crunchy pretzels, potato chips, or even a few sweet candies to contrast the tartness.
Creative Ways to Present
Lean into the novelty! Serve Dill Pickle Gummy Worms in a clean pickle jar for a fun party surprise or layer them in a candy dish nestled among real pickles. You could even skewer them on cocktail picks for a wild Bloody Mary garnish that’s guaranteed to start a conversation.
Make Ahead and Storage
Storing Leftovers
Leftover gummies store beautifully in an airtight container in the fridge for up to a week. To keep them from sticking, layer them with a sheet of parchment paper. Their texture holds up perfectly—still bouncy and flavorful!
Freezing
While you can technically freeze Dill Pickle Gummy Worms, the texture does become a bit softer once thawed. If you have extras, freeze them in a single layer and let them defrost in the fridge, but for best chewiness, enjoy them fresh.
Reheating
Because these are a cold snack, they don’t require reheating. If you find your gummies have stuck together or firmed up a little too much, just let them sit at room temperature for a couple of minutes before serving for the best eating experience.
FAQs
What kind of dill pickle juice works best for this recipe?
Any store-bought or homemade dill pickle juice will work, but for a bold, zesty flavor, opt for a classic kosher dill variety. Avoid juices with too many additives or sweeteners for the purest gummy taste.
Can I make these Dill Pickle Gummy Worms vegetarian?
Traditional gelatin comes from animal sources, but you can experiment with plant-based alternatives like agar-agar; just know that the texture will be a little different—more like gumdrops than chewy gummies.
Are these gummies very salty?
The saltiness depends on your pickle juice! Most kosher dill pickles bring a balanced salt-vinegar tang without being overpowering, and the sugar in the recipe helps round things out nicely.
Do I have to use food coloring?
Nope! The food coloring is just for that fun, bright green look. Your Dill Pickle Gummy Worms will be slightly cloudier and less vividly green without it, but they’ll taste exactly the same.
How do I make my gummies even tangier?
For a bigger pickle punch, skip the water and use a full cup of pickle juice. Expect a more intense, salty-sour flavor and an extra hit of briny goodness with every bite!
Final Thoughts
If you want to impress your friends, delight fellow pickle lovers, or just try something offbeat and fun, there’s nothing quite like whipping up a batch of Dill Pickle Gummy Worms. Give this recipe a shot—you might find yourself craving these salty-sour, wiggly snacks more often than you’d ever expect!
Print
Dill Pickle Gummy Worms Recipe
- Total Time: 1 hour 15 minutes (including chilling)
- Yield: 20–24 gummy worms 1x
- Diet: Non-Vegetarian
Description
These Dill Pickle Gummy Worms are a unique and savory twist on the classic gummy candy. Tangy and slightly sweet, these homemade treats are perfect for pickle lovers or as a fun party snack.
Ingredients
Ingredients:
- ¾ cup dill pickle juice (strained)
- ¼ cup water
- 2 tablespoons granulated sugar
- 3 tablespoons unflavored gelatin (about 3 packets)
- 1 teaspoon dill pickle seasoning or dried dill (optional)
- green food coloring (optional)
Instructions
- In a small saucepan, combine dill pickle juice, water, and sugar. Sprinkle gelatin over the liquid and let it bloom for 5 minutes.
- Place the saucepan over low heat and stir continuously until the gelatin fully dissolves, about 3–4 minutes. Do not let the mixture boil.
- Add dill pickle seasoning and a drop of green food coloring if using, then stir to combine.
- Carefully pour the mixture into gummy worm molds or silicone candy molds.
- Transfer to the refrigerator and chill for at least 1 hour or until fully set.
- Once firm, remove the gummies from the molds and store them in an airtight container in the fridge for up to 1 week.
Notes
- For a tangier gummy, use straight pickle juice without added water.
- These are a fun, salty-sour twist for pickle lovers or a novelty party treat.
- Prep Time: 10 minutes
- Cook Time: 5 minutes
- Category: Snack
- Method: No-Bake
- Cuisine: American
Nutrition
- Serving Size: 2 gummy worms
- Calories: 10
- Sugar: 1 g
- Sodium: 60 mg
- Fat: 0 g
- Saturated Fat: 0 g
- Unsaturated Fat: 0 g
- Trans Fat: 0 g
- Carbohydrates: 1 g
- Fiber: 0 g
- Protein: 2 g
- Cholesterol: 0 mg
