
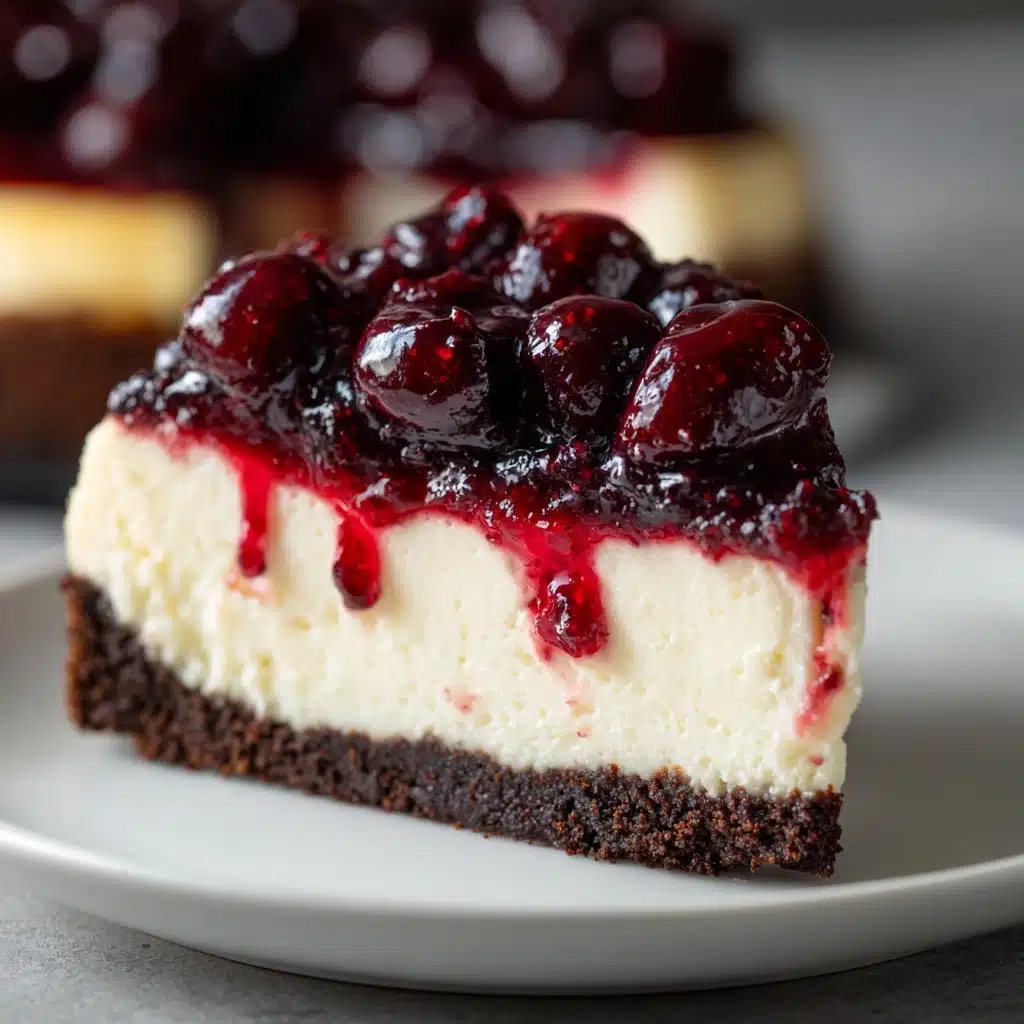
This Cherry Chocolate Cheesecake is pure decadence on a plate—a dreamy mashup of rich chocolate and tangy cherries, all riding on a buttery chocolate cookie crust. Imagine silky smooth chocolate cheesecake crowned with a jewel-like cherry topping, each bite giving you the best of both worlds: deep cocoa flavor and that irresistible sweet-tart cherry burst. Whether you’re celebrating or just treating yourself, this show-stopping dessert will bring joy to every cheesecake lover at the table.
Ingredients You’ll Need
You’ll be amazed at how a handful of everyday ingredients can transform into a Cherry Chocolate Cheesecake that looks and tastes like a masterpiece. Every component here is chosen for maximum flavor and perfect, creamy texture—plus that pop of cherry color really wows on the dessert table.
- Chocolate cookie crumbs: These form the crave-worthy base and add a hint of crunch under the soft cheesecake filling.
- Granulated sugar: Sweetens both the crust and the filling just enough to balance the cocoa and cream cheese.
- Unsalted butter (melted): Binds your cookie crumbs together, helping create a buttery, never crumbly crust.
- Cream cheese (softened): The star ingredient for indulgent, creamy cheesecake; make sure it’s at room temperature for smooth mixing.
- Unsweetened cocoa powder: Delivers rich chocolate flavor and that deep cocoa color in the filling.
- Large eggs: Bring the filling together for a luscious, custardy texture.
- Vanilla extract: Lifts the chocolate and adds a subtle warmth to round out flavors.
- Sour cream: Adds a wonderful tang and makes the filling extra silky and balanced.
- Semi-sweet chocolate chips (melted and slightly cooled): For double the chocolate punch and a velvety mouthfeel.
- Cherry pie filling: The glistening cherry crown—sweet and tart, it pairs perfectly with the cocoa base.
- Chocolate shavings or drizzle (optional): Take your Cherry Chocolate Cheesecake to the next level with an elegant, irresistible finish.
How to Make Cherry Chocolate Cheesecake
Step 1: Prepare Your Pan and Preheat
Set yourself up for cheesecake success by preheating your oven to 325°F (163°C) and prepping a 9-inch springform pan. Grease it lightly and line the bottom with parchment paper, which makes slicing—and serving—so much easier later on.
Step 2: Make the Chocolate Cookie Crust
Combine the chocolate cookie crumbs, granulated sugar, and melted butter in a bowl. Stir until the crumbs are evenly moistened. Press the mixture firmly into the bottom of your pan to form a tight, even base; use the bottom of a glass to smooth it out. Bake the crust for 8 minutes, then set aside to cool slightly while you start on the filling.
Step 3: Whip Up the Chocolate Cheesecake Filling
In a large mixing bowl, beat the softened cream cheese until it’s smooth and fluffy—no lumps here! Add the sugar and cocoa powder, mixing well. Beat in the eggs one at a time, ensuring each is fully incorporated before adding the next. Pour in the vanilla and sour cream for tang, then gently fold in the melted chocolate chips. Pour the luscious filling over your cooled crust and smooth out the top, setting the stage for a perfect Cherry Chocolate Cheesecake.
Step 4: Bake to Perfection
Place the pan in the oven and bake for 55 to 65 minutes. The edges should be set but the center will still have a gentle jiggle—that’s your sign it’s perfectly creamy inside! For best results, either use a water bath or place a pan of water on the rack below to help prevent cracks. Once done, turn off the oven, crack the door, and let your cheesecake slowly cool inside for one hour.
Step 5: Cool, Chill, and Top
Once the hour is up, remove the cheesecake from the oven and let it finish cooling at room temperature. Resist the urge to rush—this helps keep the texture dreamy and avoids cracks. Pop it into the fridge for at least four hours (overnight is even better). Just before serving, lavish your cheesecake with a generous layer of cherry pie filling and, for a true showstopper, add chocolate shavings or a playful chocolate drizzle on top.
How to Serve Cherry Chocolate Cheesecake

Garnishes
The crowning touch on every Cherry Chocolate Cheesecake is how you dress it up right before serving. A tumble of bright cherry pie filling instantly makes each slice look festive and alluring, while a scattering of chocolate shavings or a delicate drizzle of melted chocolate brings in a gourmet touch. If you’re feeling creative, a dollop of whipped cream or a light dusting of powdered sugar can add the finishing flourish.
Side Dishes
This cheesecake is absolutely decadent all on its own, but you can serve it with thoughtful accompaniments to round out the dessert course. Try pairing slices with a handful of fresh cherries during cherry season, or a scoop of vanilla ice cream for that classic chocolate-cherry-cream trifecta. If you’re serving to a crowd, a platter of fresh berries or a pot of strong coffee balances the richness beautifully.
Creative Ways to Present
If you want to truly wow your guests, slice the Cherry Chocolate Cheesecake into bite-sized bars for a party tray, or serve individual minis in small mason jars for a charming and portable treat. For a celebration, decorate the whole cheesecake with chocolate-dipped cherries around the border, or arrange fresh mint leaves for a bright contrast to the chocolate and cherry reds.
Make Ahead and Storage
Storing Leftovers
Leftover Cherry Chocolate Cheesecake keeps wonderfully in the fridge for up to five days. Just cover the pan with foil or transfer slices to an airtight container. The flavors actually deepen a bit after a day, making your second slice just as delicious as the first!
Freezing
For longer storage, you can freeze the cheesecake—either whole (without the cherry topping) or as individual slices. Wrap it tightly in plastic wrap and then foil, and freeze for up to one month. To serve, thaw in the refrigerator overnight, then add the cherry topping right before enjoying.
Reheating
While Cherry Chocolate Cheesecake is best enjoyed chilled or at room temperature, you can bring a refrigerated slice to room temp by letting it rest on the counter for 30 minutes for the creamiest texture. Avoid microwaving, as it can change the structure of the cheesecake and melt the cherry topping.
FAQs
Can I make Cherry Chocolate Cheesecake ahead for a party?
Absolutely! In fact, this dessert gets even better with time. You can prepare the cheesecake a day or even two in advance, just wait to add the cherry topping until right before serving for the freshest look and flavor.
What kind of chocolate cookies work best for the crust?
Classic chocolate wafer cookies are wonderful, but you can also use chocolate sandwich cookies (with or without the filling). Crush them finely for an even, press-able crumb.
Is it possible to use homemade cherry topping instead of canned?
Yes, and it’s a fantastic way to add a fresh, personal touch. Make a quick cherry compote by simmering pitted cherries with a bit of sugar and lemon juice until thickened—just let it cool before spooning over your cheesecake.
How do I prevent cracks in my cheesecake?
Baking your Cherry Chocolate Cheesecake gently is the key. Use a water bath or place a pan of water in the oven to add moisture, don’t overbake, and let the cheesecake cool gradually in the oven with the door cracked open.
What’s the best way to cut clean cheesecake slices?
Dip a large sharp knife in hot water and wipe it dry between each slice. This helps you glide through the creamy layers neatly for picture-perfect servings.
Final Thoughts
If you’re looking for a dessert that’s a guaranteed crowd-pleaser, nothing delights quite like Cherry Chocolate Cheesecake. The medley of silky chocolate, tangy cherry, and a perfectly crisp crust truly has it all. Whether it’s a family celebration or just a weeknight treat, give this recipe a try and watch the smiles (and empty plates) pile up!
Print
Cherry Chocolate Cheesecake Recipe
- Total Time: 1 hour 25 minutes (plus chilling time)
- Yield: 12 servings 1x
- Diet: Vegetarian
Description
Indulge in the decadent delight of this Cherry Chocolate Cheesecake, a rich and creamy dessert that perfectly balances the flavors of chocolate and cherry. With a chocolate cookie crust, velvety cream cheese filling, and a topping of luscious cherry pie filling, this dessert is a showstopper for any occasion.
Ingredients
For the crust:
- 1 1/2 cups chocolate cookie crumbs
- 1/4 cup granulated sugar
- 1/3 cup unsalted butter, melted
For the filling:
- 3 (8-ounce) packages cream cheese, softened
- 1 cup granulated sugar
- 1/4 cup unsweetened cocoa powder
- 3 large eggs
- 1 teaspoon vanilla extract
- 1/2 cup sour cream
- 1/2 cup semi-sweet chocolate chips, melted and slightly cooled
For the topping:
- 1 (21-ounce) can cherry pie filling
- Chocolate shavings or drizzle (optional)
Instructions
- Preheat the oven to 325°F (163°C). Grease a 9-inch springform pan and line the bottom with parchment paper.
- In a bowl, combine chocolate cookie crumbs, sugar, and melted butter. Press into the pan to form a crust. Bake for 8 minutes.
- In a large mixing bowl, beat cream cheese until smooth. Add sugar, cocoa powder, eggs, vanilla extract, and sour cream. Fold in melted chocolate. Pour over crust.
- Bake for 55–65 minutes until set. Cool in the oven, then refrigerate for at least 4 hours.
- Top with cherry pie filling and garnish with chocolate.
Notes
- To prevent cracks, bake in a water bath or use a pan of water in the oven.
- You can use fresh cherry compote instead of canned filling for a homemade touch.
- Prep Time: 25 minutes
- Cook Time: 1 hour
- Category: Dessert
- Method: Baking
- Cuisine: American
Nutrition
- Serving Size: 1 slice
- Calories: 470
- Sugar: 34g
- Sodium: 300mg
- Fat: 31g
- Saturated Fat: 18g
- Unsaturated Fat: 11g
- Trans Fat: 0g
- Carbohydrates: 42g
- Fiber: 2g
- Protein: 7g
- Cholesterol: 115mg


