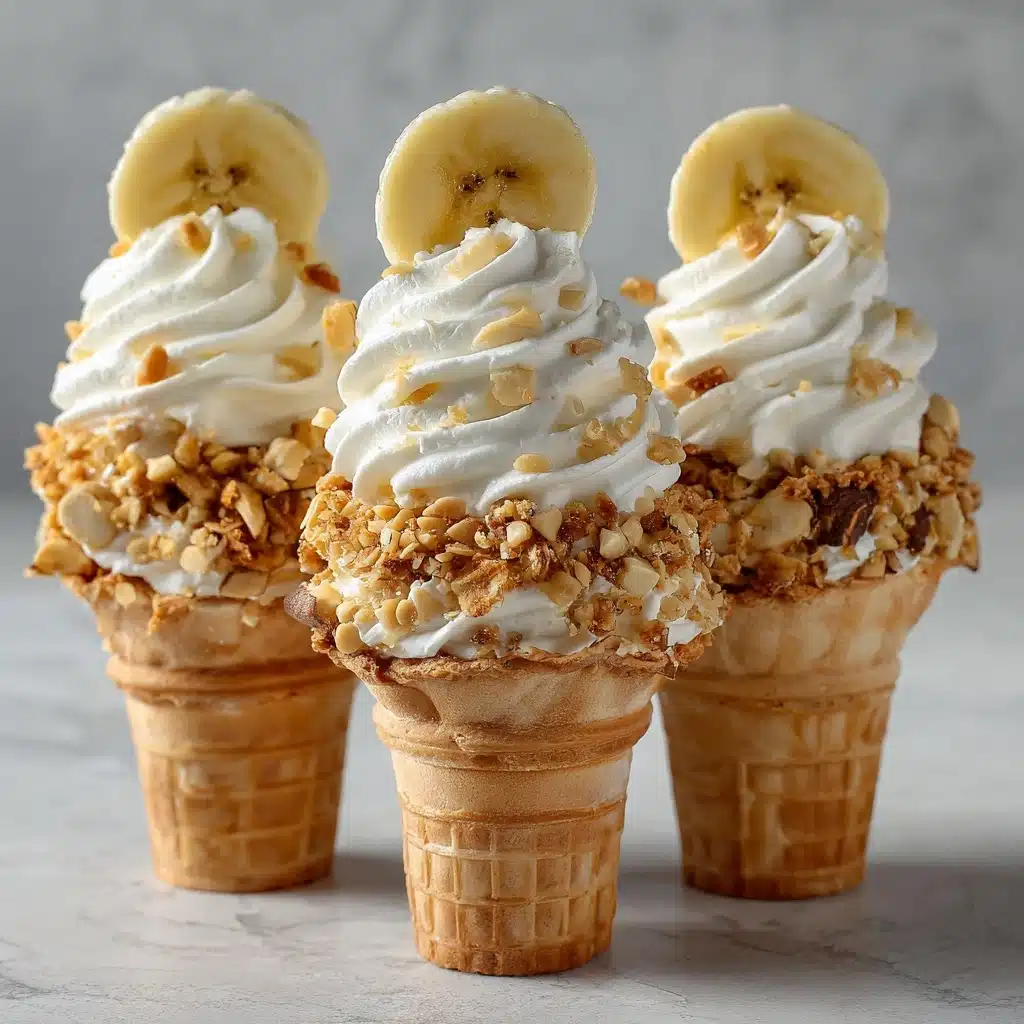
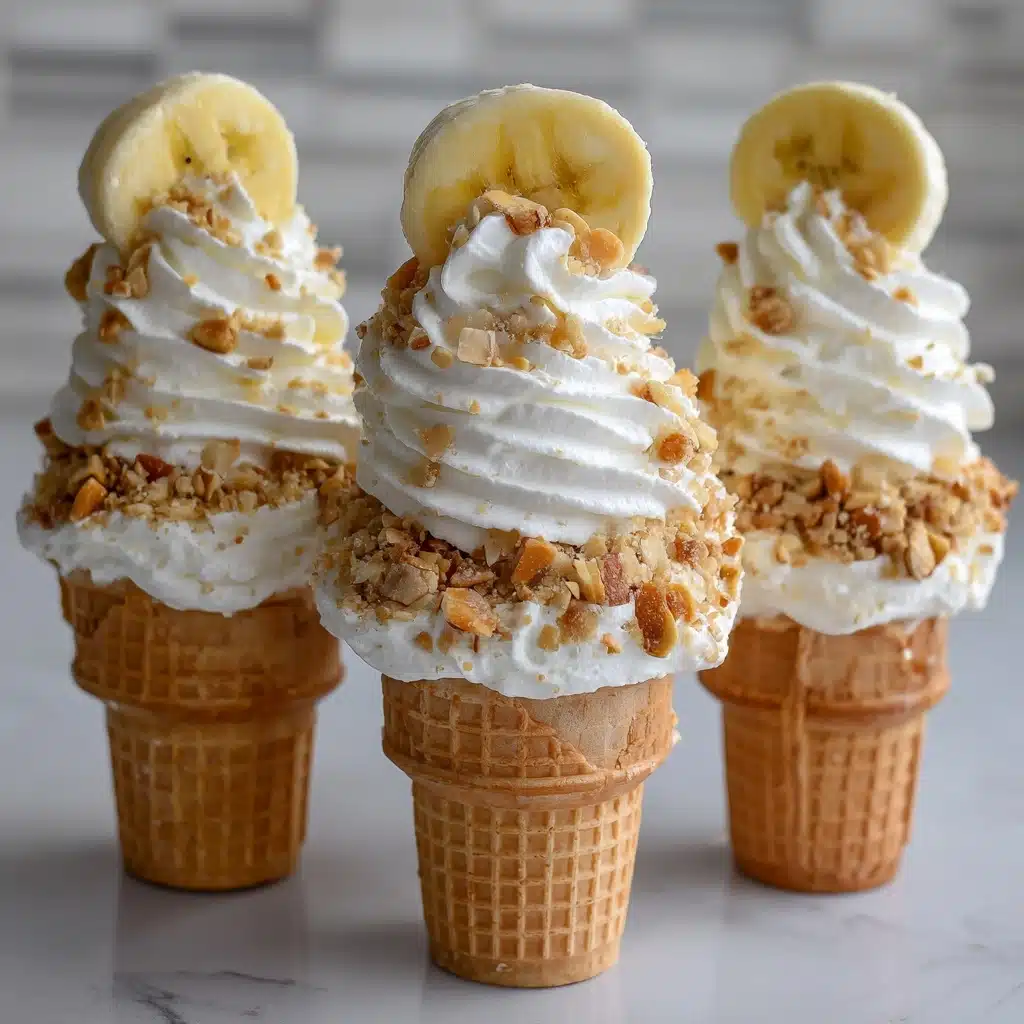
If you love whimsical desserts as much as I do, you’re about to be smitten with these Banana Pudding Cheesecake Cones! Imagine all the classic Southern banana pudding goodness, plus the dreamy tang of cheesecake, packed right into a crunchy waffle cone you can grab and go. Each bite is perfectly layered with fluffy, creamy bliss, sweet bananas, and vanilla wafer crunch. This treat is made for birthday parties, backyard BBQs, or simply those days when you need a little joy in every bite.
Ingredients You’ll Need
These simple building blocks bring Banana Pudding Cheesecake Cones to life, balancing smooth, creamy textures with pops of crunch and fresh banana flavor. Each one plays a starring role in delivering that nostalgic, just-one-more-bite feeling.
- Waffle cones: The vehicle for this whole dessert, offering irresistible crunch and an edible serving dish all in one.
- Cream cheese (softened): Brings a silky, tangy cheesecake flavor that pairs beautifully with bananas and vanilla.
- Heavy whipping cream: Whips up fluffy and light, making your cheesecake filling irresistibly airy.
- Powdered sugar: Dissolves smoothly into the cheesecake mixture, giving gentle sweetness without any grit.
- Vanilla extract: Just a teaspoon unlocks a warm, fragrant aroma and classic dessert flavor.
- Instant banana pudding mix: For that old-fashioned Southern banana pudding flavor and instant thickening magic.
- Cold milk: Brings the pudding mix together and adds creaminess to the overall dessert.
- Crushed vanilla wafers: Layered throughout for sweet crunch and a little nostalgic energy.
- Banana (sliced): Fresh fruit keeps every bite lively, sweet, and authentically banana-forward.
- Whipped cream & extra crushed wafers (optional): For a playful, party-perfect garnish to top each cone.
How to Make Banana Pudding Cheesecake Cones
Step 1: Make the Banana Pudding
In a medium bowl, whisk your instant banana pudding mix and cold milk for about 2 minutes until it thickens up. This step sets the stage for that unmistakable banana flavor and ensures each cone will be perfectly creamy, never runny. Set it aside so it’s ready to fold into your cheesecake base.
Step 2: Beat the Cream Cheese Mixture
Next, grab a large bowl and beat the softened cream cheese until it’s silky smooth. Sprinkle in the powdered sugar and add the vanilla extract, mixing until everything is well combined. This creamy mixture forms the backbone of your Banana Pudding Cheesecake Cones, providing that lush, tangy richness.
Step 3: Whip and Fold in the Cream
In a separate bowl, whip the heavy cream until stiff peaks form. This will add wonderful volume and lightness. Gently fold the whipped cream into your cream cheese mixture—no rushing here, just use a spatula and sweep under and over until it’s all fluffy and unified. Smooth, pillowy goodness awaits!
Step 4: Combine with Banana Pudding
Now, grab your thickened banana pudding and fold it into the cream cheese-whipped cream mixture. You want to gently incorporate it until no streaks remain and everything is a uniform, pale banana yellow. Now you’ve got the ultimate filling for your cones.
Step 5: Assemble the Cones
Sprinkle a spoonful of crushed vanilla wafers into the base of each waffle cone—this not only adds a lovely crunch but stops the filling from soggifying the tip. Fill the cones by piping or spooning in layers of the cheesecake mixture, extra crushed wafers, and banana slices if you love a big banana punch. Finish strong: add a flourish of whipped cream and a scatter of more crushed wafers on top. Serve immediately for maximum crunch, or chill briefly if you want them a tad more set.
How to Serve Banana Pudding Cheesecake Cones

Garnishes
A dollop of whipped cream and a sprinkle of extra crushed vanilla wafers on top make every cone partyworthy. For even more flair, add a couple of banana slices or a drizzle of caramel sauce—each bite will look (and taste!) totally irresistible.
Side Dishes
These cones are stars on their own, but if you’re planning a dessert spread, serve them alongside fresh berries, mini chocolate chips, or candied pecans for extra color and flavor contrasts. A tall, cold glass of milk or a scoop of vanilla ice cream beside the Banana Pudding Cheesecake Cones never hurts either!
Creative Ways to Present
Try standing the finished cones upright in a tall glass or a display stand for a fun, bakery-style effect. Or, dip the rims of your cones in melted white chocolate, then roll in crushed wafers before filling for that wow-factor at your next get-together. You can even wrap each cone in a bit of parchment paper, tie with ribbon, and send them home as the cutest edible party favors.
Make Ahead and Storage
Storing Leftovers
If you find yourself with extra Banana Pudding Cheesecake Cones (though that’s rare!), store them in the refrigerator upright, uncovered or loosely covered to keep the cones from softening too much. Best enjoyed within a day, as the cone will eventually get a little softer from the creamy filling.
Freezing
It’s not recommended to freeze fully assembled cones, since the texture of both the waffle cone and bananas will be compromised. However, you can prepare the cheesecake filling and banana pudding layers ahead of time, freeze them separately, and thaw overnight in the refrigerator before assembling fresh cones the day you plan to serve.
Reheating
No reheating necessary here! These cones are best served cold or at room temperature. If you’ve chilled them for a bit, simply let them sit out briefly to soften the filling before enjoying.
FAQs
Can I make Banana Pudding Cheesecake Cones ahead of time?
You can certainly prepare the cheesecake-pudding filling up to a day ahead, storing it in an airtight container in the fridge. Assemble the cones right before serving to keep the crunch at its peak!
What if I don’t have instant banana pudding mix?
If you can’t get your hands on instant banana pudding, vanilla pudding plus a little mashed ripe banana can make a decent substitute. You might lose a touch of that classic yellow hue, but the flavor still shines.
How do I keep bananas from browning?
For the freshest look, slice the bananas right before you assemble the cones. You can lightly coat slices in lemon juice to help slow browning, but it’s usually not needed if serving immediately.
Can I use a different type Dessert
Absolutely! Sugar cones work if you want a crispier, slightly sweeter shell, or even chocolate-dipped cones for extra flair. Just be sure your cones are sturdy enough to hold the filling.
Is there a way to make this dessert gluten-free?
Definitely! Look for gluten-free cones and swap in gluten-free vanilla cookies instead of traditional wafers. Everything else in the Banana Pudding Cheesecake Cones is naturally gluten-free, so everyone can share in the fun.
Final Thoughts
I can’t wait for you to try Banana Pudding Cheesecake Cones at your next party or just as a spontaneous treat for your family. It’s the kind of recipe that feels playful and nostalgic, yet impressive with every bite. Gather your ingredients, invite some friends, and get ready to watch these cones disappear faster than you can say “just one more!”
Print
Banana Pudding Cheesecake Cones Recipe
- Total Time: 20 minutes
- Yield: 6 cones
- Diet: Vegetarian
Description
These Banana Pudding Cheesecake Cones are a delightful dessert featuring a creamy banana cheesecake filling nestled in crispy waffle cones. Perfect for any occasion, these no-bake treats are easy to make and sure to impress!
Ingredients
Waffle Cones:
- 6 waffle cones
Cheesecake Filling:
- 8 ounces cream cheese (softened), 1 cup heavy whipping cream, ½ cup powdered sugar, 1 teaspoon vanilla extract
Banana Pudding Layer:
- 1 (3.4-ounce) box instant banana pudding mix, 1 cup cold milk
Additional:
- 1½ cups crushed vanilla wafers, 1 banana (sliced), whipped cream and extra crushed wafers for topping (optional)
Instructions
- Prepare Banana Pudding: Whisk banana pudding mix and cold milk in a medium bowl for about 2 minutes until thickened. Set aside.
- Make Cheesecake Filling: In a large bowl, beat softened cream cheese until smooth. Add powdered sugar and vanilla extract, mix until combined.
- Whip Cream: In another bowl, whip heavy cream until stiff peaks form. Gently fold into cream cheese mixture until smooth. Fold in prepared banana pudding.
- Assemble Cones: Place crushed vanilla wafers in each cone. Fill with banana cheesecake filling, layering with wafers and banana slices. Top with whipped cream and crushed wafers. Serve immediately or chill briefly.
Notes
- For best texture, serve shortly after assembling to keep cones crisp.
- You can dip cone rims in melted white chocolate and roll in crushed wafers for a decorative touch.
- Prep Time: 20 minutes
- Cook Time: 0 minutes
- Category: Dessert
- Method: No-Bake
- Cuisine: American
Nutrition
- Serving Size: 1 cone
- Calories: 360
- Sugar: 22g
- Sodium: 220mg
- Fat: 22g
- Saturated Fat: 13g
- Unsaturated Fat: 8g
- Trans Fat: 0g
- Carbohydrates: 35g
- Fiber: 1g
- Protein: 4g
- Cholesterol: 75mg
