
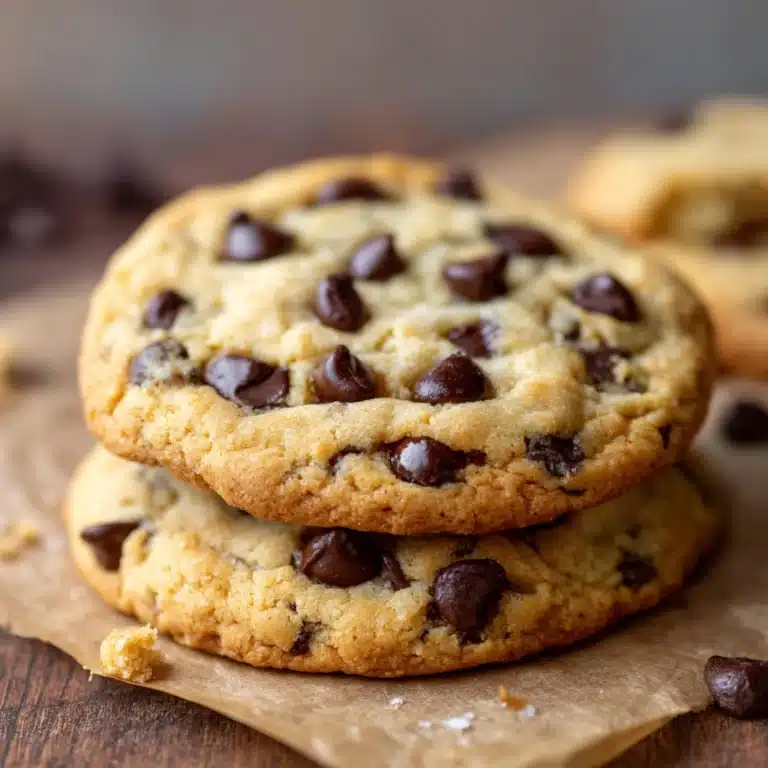
If there’s one treat that instantly brings a smile to everyone’s face, it’s Chocolate Kiss Cookies. These delightful little morsels are the perfect blend of soft, cocoa-infused cookie and a luscious chocolate kiss nestled right in the center. Whether you’re baking for a holiday cookie exchange, a family movie night, or just because you need a little chocolate joy, these cookies are guaranteed to become a household favorite. The combination of rich chocolate, buttery crumb, and that iconic chocolate kiss makes every bite a celebration.

Ingredients You’ll Need
You won’t need a mile-long shopping list for Chocolate Kiss Cookies—just a handful of classic baking staples. Each ingredient pulls its weight, contributing to the rich flavor, tender texture, or sparkling appearance of these irresistible cookies.
- Unsalted butter (1 cup, softened): The key to a soft, melt-in-your-mouth cookie, butter adds flavor and keeps the crumb tender.
- Granulated sugar (1 cup, plus extra for rolling): Sweetens the dough and creates a beautiful, sparkly exterior when rolled before baking.
- Large egg (1): Binds the dough and adds rich texture.
- Vanilla extract (1 teaspoon): Enhances the chocolate flavor and gives the cookies a warm, inviting aroma.
- All-purpose flour (2 cups): Provides structure and a soft bite.
- Unsweetened cocoa powder (¼ cup): Deepens the chocolate flavor and gives the cookies their signature color.
- Baking soda (½ teaspoon): Helps the cookies puff up just enough for the perfect texture.
- Salt (¼ teaspoon): Balances the sweetness and intensifies the chocolate notes.
- Chocolate kiss candies (24, unwrapped): The star of the show—each cookie gets a chocolate kiss pressed into its center for a fun and delicious finish.
How to Make Chocolate Kiss Cookies
Step 1: Cream the Butter and Sugar
Start by preheating your oven to 350°F and lining a baking sheet with parchment paper. In a large bowl, cream together the softened butter and granulated sugar until the mixture is light and fluffy. This step is crucial for creating a soft, tender cookie—don’t rush it! A hand mixer makes it easy, but a good old-fashioned wooden spoon works too with a little extra elbow grease.
Step 2: Add the Egg and Vanilla
Once your butter and sugar are perfectly creamed, beat in the egg and vanilla extract. The egg gives the dough structure, while the vanilla rounds out the chocolate flavor. Make sure everything is well combined before moving on to the dry ingredients.
Step 3: Combine the Dry Ingredients
In a separate bowl, whisk together the flour, unsweetened cocoa powder, baking soda, and salt. Whisking helps distribute the cocoa and leavening evenly, so every bite of your Chocolate Kiss Cookies will have the same rich, chocolatey flavor.
Step 4: Bring It All Together
Gradually add the dry ingredients to the wet mixture, mixing until a soft dough forms. The dough should be thick but not sticky. If it feels too soft to handle, pop it in the fridge for 15–20 minutes—this little trick makes rolling a breeze and helps your cookies bake up perfectly.
Step 5: Shape and Roll
Scoop out 1-inch portions of dough and roll each into a ball. Next, roll each ball in a shallow dish of granulated sugar to give the cookies a sweet, sparkly coating. This step adds a lovely crunch and makes the cookies look extra festive.
Step 6: Bake to Perfection
Place the dough balls on your prepared baking sheet, spacing them about 2 inches apart. Bake for 8–10 minutes, just until the cookies are set and puffed. Don’t overbake—you want them soft and tender!
Step 7: Add the Chocolate Kiss
As soon as the cookies come out of the oven, gently press a chocolate kiss candy into the center of each one. The heat will slightly melt the chocolate, helping it adhere to the cookie, and create that signature “kiss” look. Let the cookies cool on the baking sheet for 5 minutes, then transfer them to a wire rack to cool completely.
How to Serve Chocolate Kiss Cookies

Garnishes
A simple dusting of powdered sugar or a drizzle of melted white chocolate can make these Chocolate Kiss Cookies extra special. For a festive twist, try using colored sugar or sprinkles before baking, or even holiday-themed chocolate kisses to tie into the season.
Side Dishes
Serve these cookies with a tall glass of cold milk, a mug of hot cocoa, or even a creamy latte. They’re also a perfect addition to a dessert platter alongside fresh fruit, brownies, or other classic cookies for variety and color.
Creative Ways to Present
Stack your Chocolate Kiss Cookies in a clear glass jar tied with a ribbon for a charming homemade gift. You can also arrange them on a tiered cake stand for a show-stopping centerpiece at any party or gathering. For a playful touch, tuck a few into festive treat bags and share with friends and neighbors.
Make Ahead and Storage
Storing Leftovers
Chocolate Kiss Cookies store beautifully! Keep them in an airtight container at room temperature for up to five days. They’ll stay soft and delicious, making them perfect for snacking or packing into lunchboxes all week long.
Freezing
To freeze, let the cookies cool completely, then layer them between sheets of parchment paper in a freezer-safe container. They’ll keep for up to three months. You can also freeze the unbaked dough balls (without the chocolate kiss), then bake straight from the freezer and add the chocolate kisses as soon as they’re out of the oven.
Reheating
If you love a warm cookie, pop one or two Chocolate Kiss Cookies in the microwave for just 5–10 seconds. The chocolate will get a little gooey, and the cookie will taste freshly baked—like a cozy treat straight from the oven!
FAQs
Can I use salted butter instead of unsalted?
Yes! If you only have salted butter on hand, just skip the added salt in the recipe. Your Chocolate Kiss Cookies will still turn out delicious with a slightly more pronounced buttery flavor.
Do the cookies stay soft after baking?
Absolutely. Thanks to the generous amount of butter and the careful bake time, these cookies stay soft and tender for days—just store them in an airtight container to keep them at their best.
Can I make these cookies with different flavored chocolate kisses?
Definitely! Swap classic milk chocolate kisses for caramel-filled, dark chocolate, or even peppermint varieties to give your Chocolate Kiss Cookies a unique twist. It’s a fun way to match the cookies to any occasion or personal preference.
Is it necessary to chill the dough?
Chilling isn’t strictly required, but if your dough feels too soft or sticky, a quick 15–20 minutes in the fridge makes it much easier to handle. Chilled dough also helps the cookies hold their shape during baking.
Can I double the recipe for a crowd?
Absolutely! This recipe doubles beautifully—just make sure to mix the dough thoroughly and bake in batches. Chocolate Kiss Cookies are always a hit at parties, potlucks, and bake sales, so don’t be afraid to make extra.
Final Thoughts
There’s something truly magical about making and sharing a batch of Chocolate Kiss Cookies. With their classic look, irresistible chocolate flavor, and melt-in-your-mouth texture, they’re destined to become a go-to recipe in your kitchen. Give them a try—you’ll be amazed at how quickly they disappear!
Print
Chocolate Kiss Cookies Recipe
- Total Time: 25 minutes
- Yield: 24 cookies 1x
- Diet: Vegetarian
Description
Delight in these classic Chocolate Kiss Cookies, crispy on the outside with a soft, chocolaty center crowned by a melted chocolate kiss. Perfect for holiday treats or anytime you crave a sweet, chocolatey bite.
Ingredients
Wet Ingredients
- 1 cup unsalted butter (softened)
- 1 cup granulated sugar
- 1 large egg
- 1 teaspoon vanilla extract
Dry Ingredients
- 2 cups all-purpose flour
- ¼ cup unsweetened cocoa powder
- ½ teaspoon baking soda
- ¼ teaspoon salt
Additional
- 24 chocolate kiss candies (unwrapped)
- Additional granulated sugar for rolling
Instructions
- Preheat Oven: Preheat your oven to 350°F (175°C) and line a baking sheet with parchment paper to prevent sticking and allow even baking.
- Cream Butter and Sugar: In a large bowl, use a mixer to beat the softened butter and granulated sugar together until the mixture is light and fluffy, creating a creamy base for your dough.
- Add Egg and Vanilla: Beat in the large egg and vanilla extract until fully combined, ensuring a smooth and uniform batter.
- Mix Dry Ingredients: In a separate bowl, whisk together the all-purpose flour, unsweetened cocoa powder, baking soda, and salt to evenly distribute the leavening and flavor elements.
- Combine Dry and Wet Ingredients: Gradually add the dry ingredient mixture to the wet ingredients, stirring until a soft, cohesive dough forms without overmixing.
- Form Dough Balls: Scoop dough portions approximately 1 inch in diameter, roll them into smooth balls, and then roll each ball in granulated sugar to add a sweet, slightly crunchy coating.
- Arrange and Bake: Place the dough balls about 2 inches apart on the prepared baking sheet and bake in the preheated oven for 8 to 10 minutes, or until the cookies are set but still soft.
- Add Chocolate Kisses: Immediately after removing the cookies from the oven, gently press one unwrapped chocolate kiss candy into the center of each cookie so it melts slightly and adheres.
- Cool: Let the cookies cool on the baking sheet for 5 minutes to firm up, then transfer them to a wire rack to cool completely, allowing the chocolate kiss to solidify perfectly.
Notes
- If the dough is too soft and difficult to handle, chill it in the refrigerator for 15 to 20 minutes for easier rolling.
- Store cookies in an airtight container at room temperature for up to 5 days to maintain freshness.
- For a festive twist, use holiday-themed chocolate kisses or roll the dough balls in colored sugar before baking.
- Prep Time: 15 minutes
- Cook Time: 10 minutes
- Category: Dessert
- Method: Baking
- Cuisine: American
Nutrition
- Serving Size: 1 cookie
- Calories: 160
- Sugar: 11g
- Sodium: 65mg
- Fat: 9g
- Saturated Fat: 5g
- Unsaturated Fat: 3g
- Trans Fat: 0g
- Carbohydrates: 19g
- Fiber: 1g
- Protein: 2g
- Cholesterol: 20mg
